Agentic Workflow Definition
Overview
An AI agent uses artificial intelligence to perceive its environment, make decisions, and take actions to achieve specific goals. In our context, an AI agent is an entity powered by an LLM model and equipped with specialized tools (MCP tools).
An agentic workflow orchestrates one or multiple AI agents working together towards a common objective. These workflows can range from simple single-agent tasks to complex multi-agent orchestrations.
Getting Started
1. Create Your Workflow
- Go to
Agentic Workflowsand click onCreate new workflowbutton. The window already contains a pre-populated test code example:
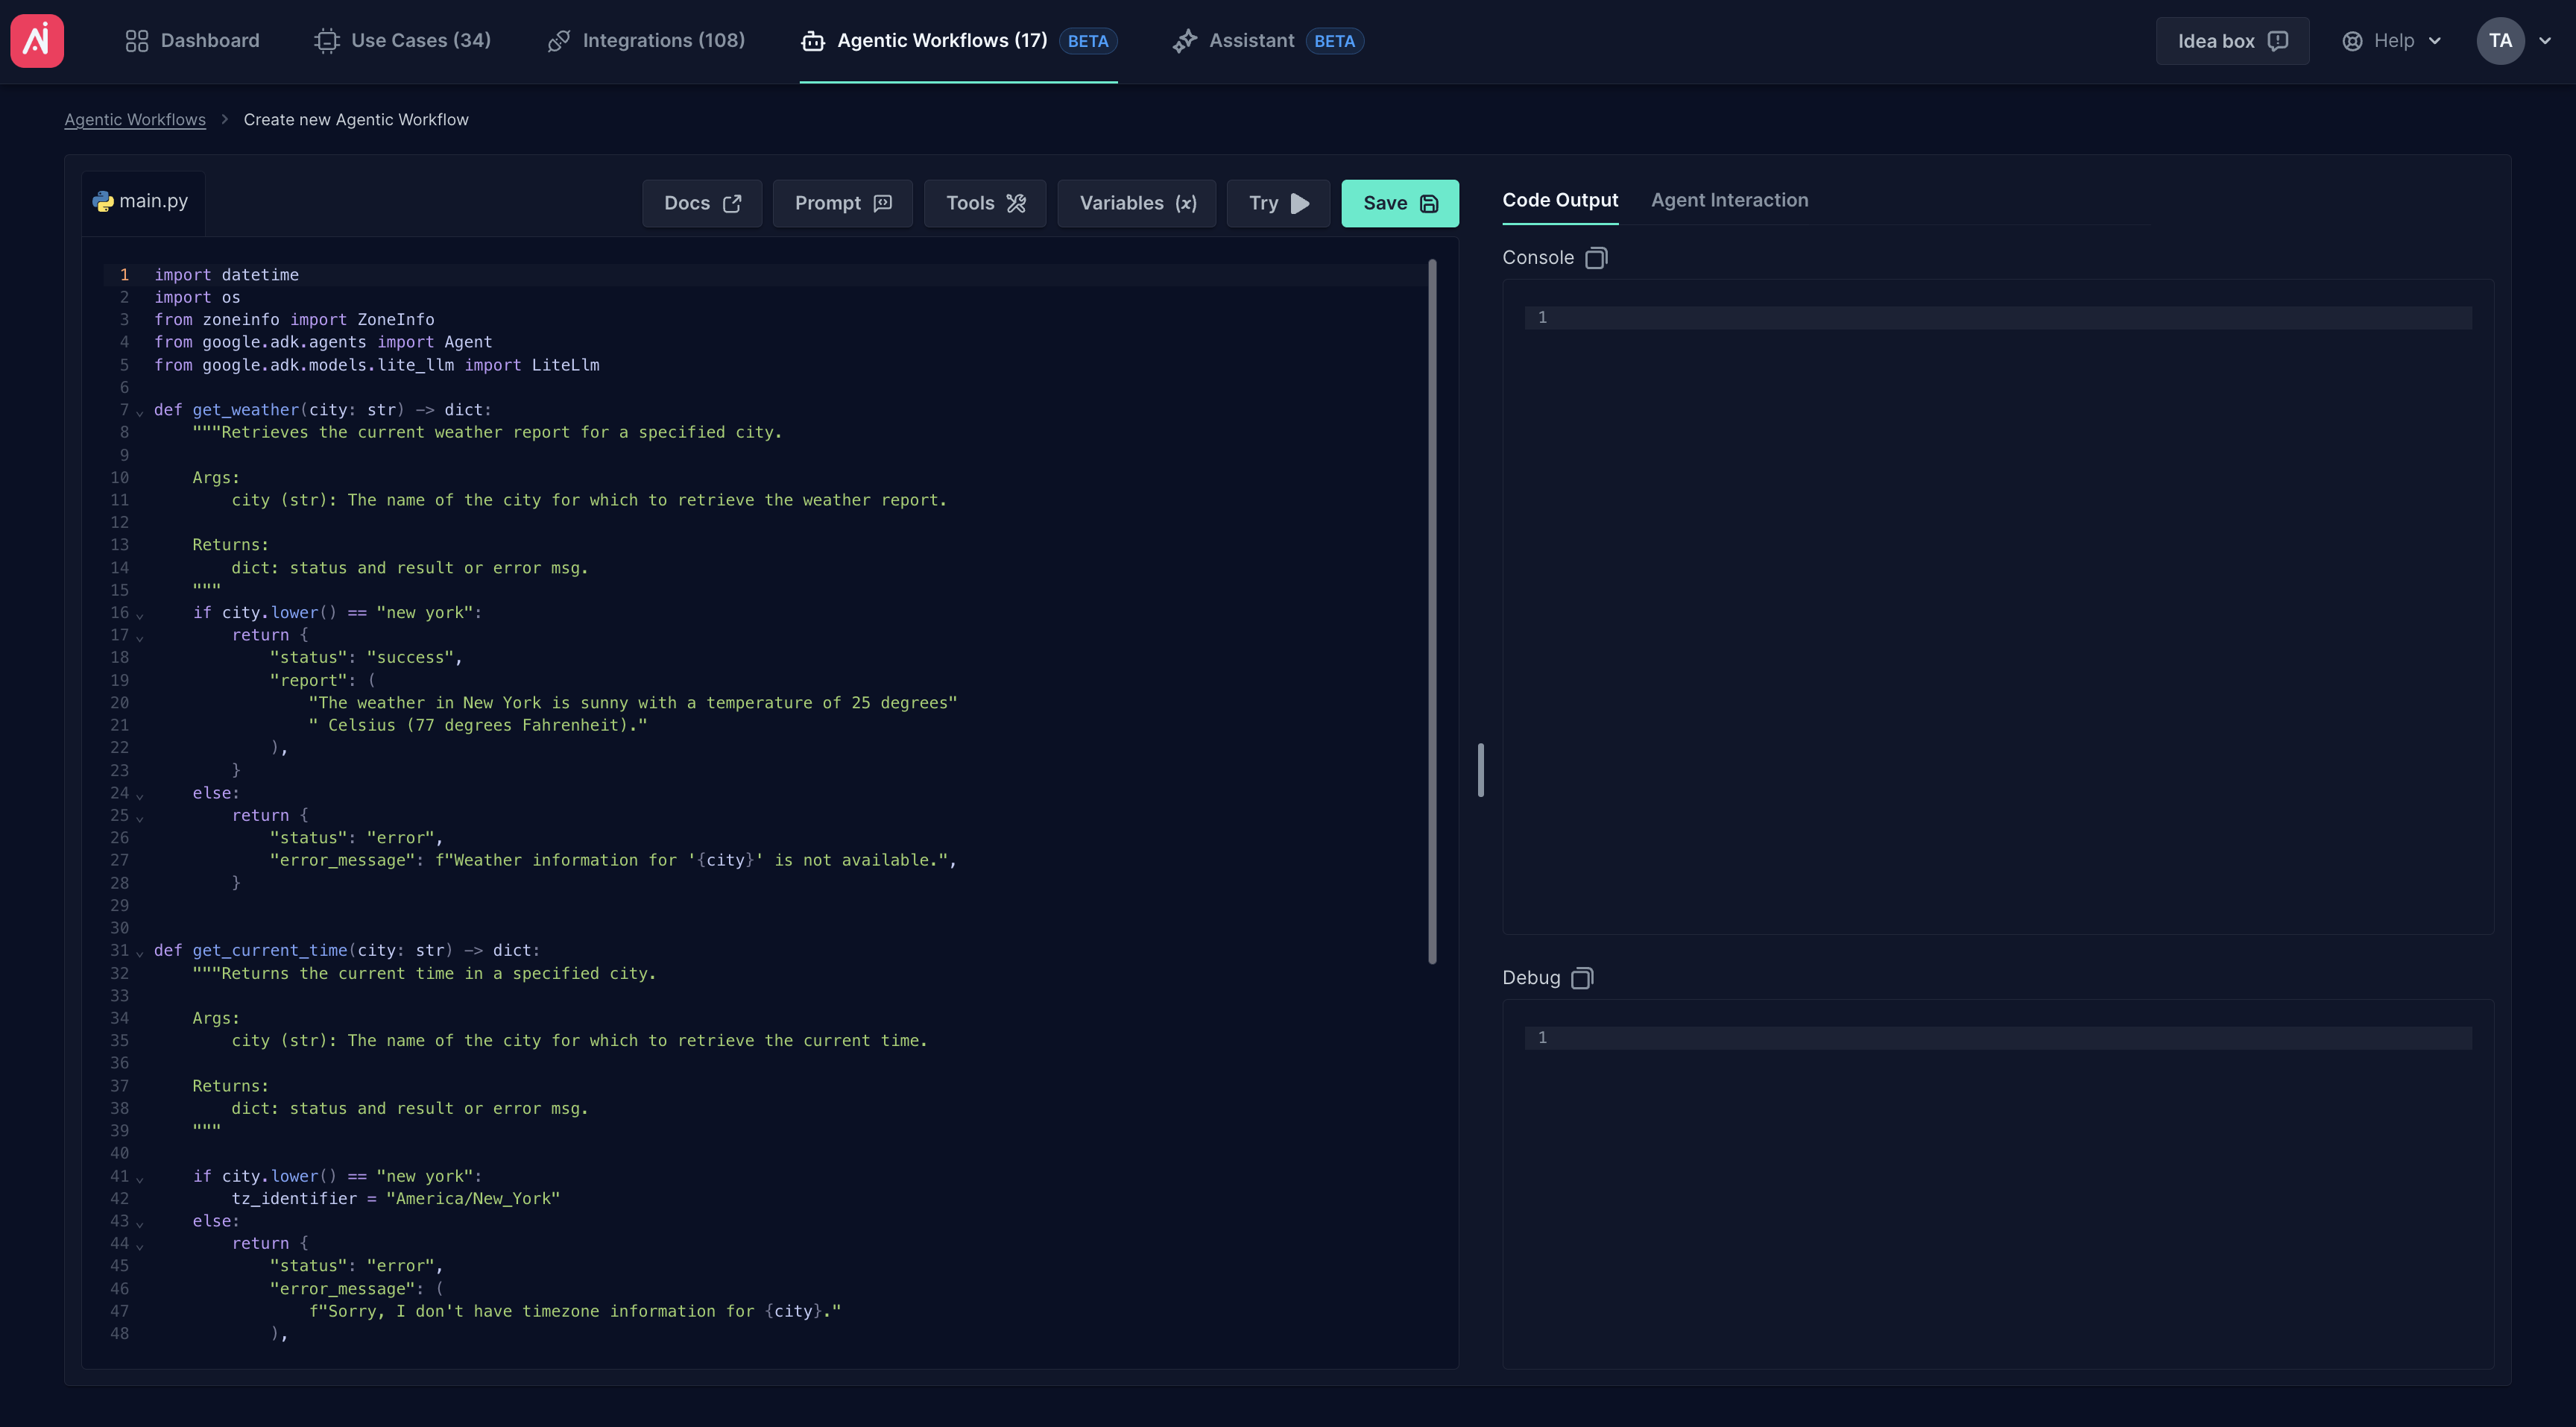
This Python script demonstrates the creation of an agentic workflow named weather_time_agent using the Google Agent Development Kit (ADK) and the gemini/gemini-2.0-flash model through LiteLLM. The agent is designed to answer user questions about the current time and weather in a specified city.
2. Configure LLM Provider
- Before executing the agentic workflow, set the credentials for your chosen LLM provider, e.g.:

Make sure Arcanna has internet access to the chosen LLM provider.
- Google Gemini
- AWS Bedrock
- OpenAI
- Azure OpenAI
- Anthropic
Supported models can be seen here.
GEMINI_API_KEY=YOUR_GEMINI_API_KEY
Supported models can be seen here.
AWS_ACCESS_KEY_ID=YOUR_AWS_ACCESS_KEY_ID
AWS_SECRET_ACCESS_KEY=YOUR_AWS_SECRET_ACCESS_KEY
AWS_REGION_NAME=YOUR_AWS_REGION_NAME
Supported models can be seen here.
OPENAI_API_KEY=YOUR_OPENAI_API_KEY
Supported models can be seen here.
AZURE_API_KEY=YOUR_AZURE_API_KEY
AZURE_API_BASE=YOUR_AZURE_API_BASE
AZURE_API_VERSION=YOUR_AZURE_API_VERSION

# optional
AZURE_AD_TOKEN=YOUR_AZURE_AD_TOKEN
AZURE_API_TYPE=YOUR_AZURE_API_TYPE
Supported models can be seen here.
ANTHROPIC_API_KEY=YOUR_ANTHROPIC_API_KEY

# optional
ANTHROPIC_API_BASE=YOUR_ANTHROPIC_API_BASE # or ANTHROPIC_BASE_URL
3. Test and Debug
-
Click the 'Try' button. This button has two main purposes:
- It checks the syntax of the code and ensures that it is valid.
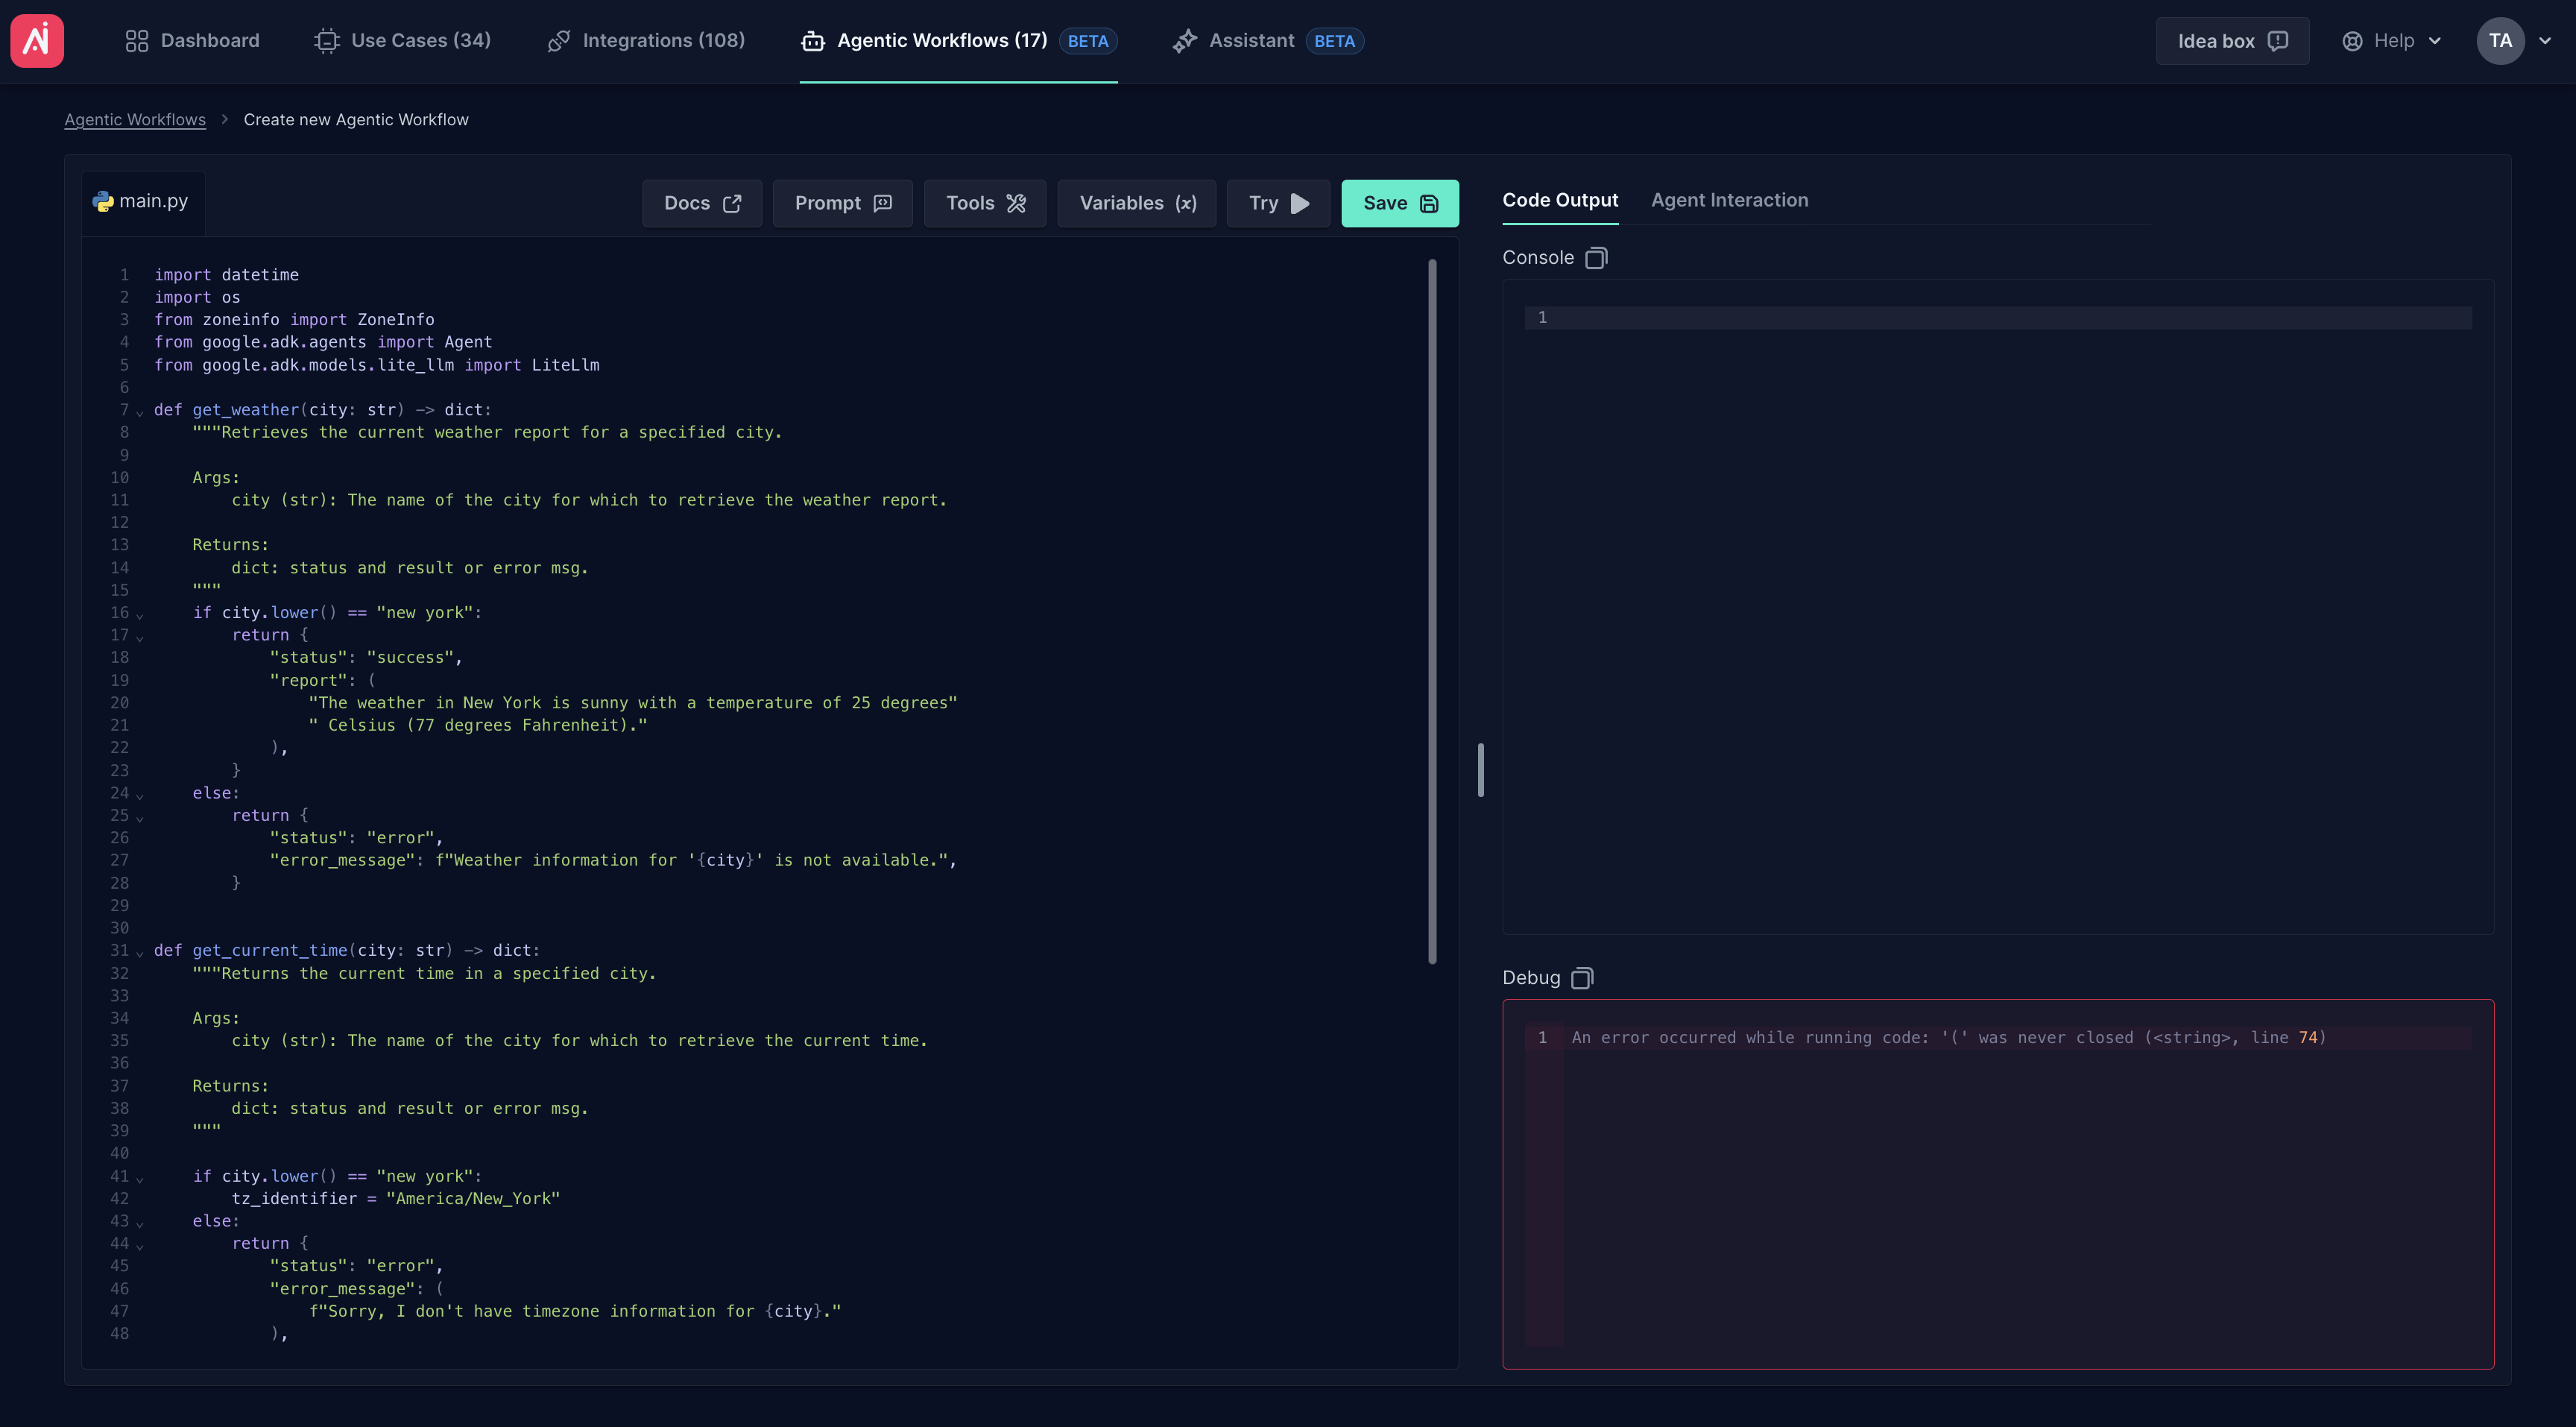
- It can be used for debugging purposes, using prints.
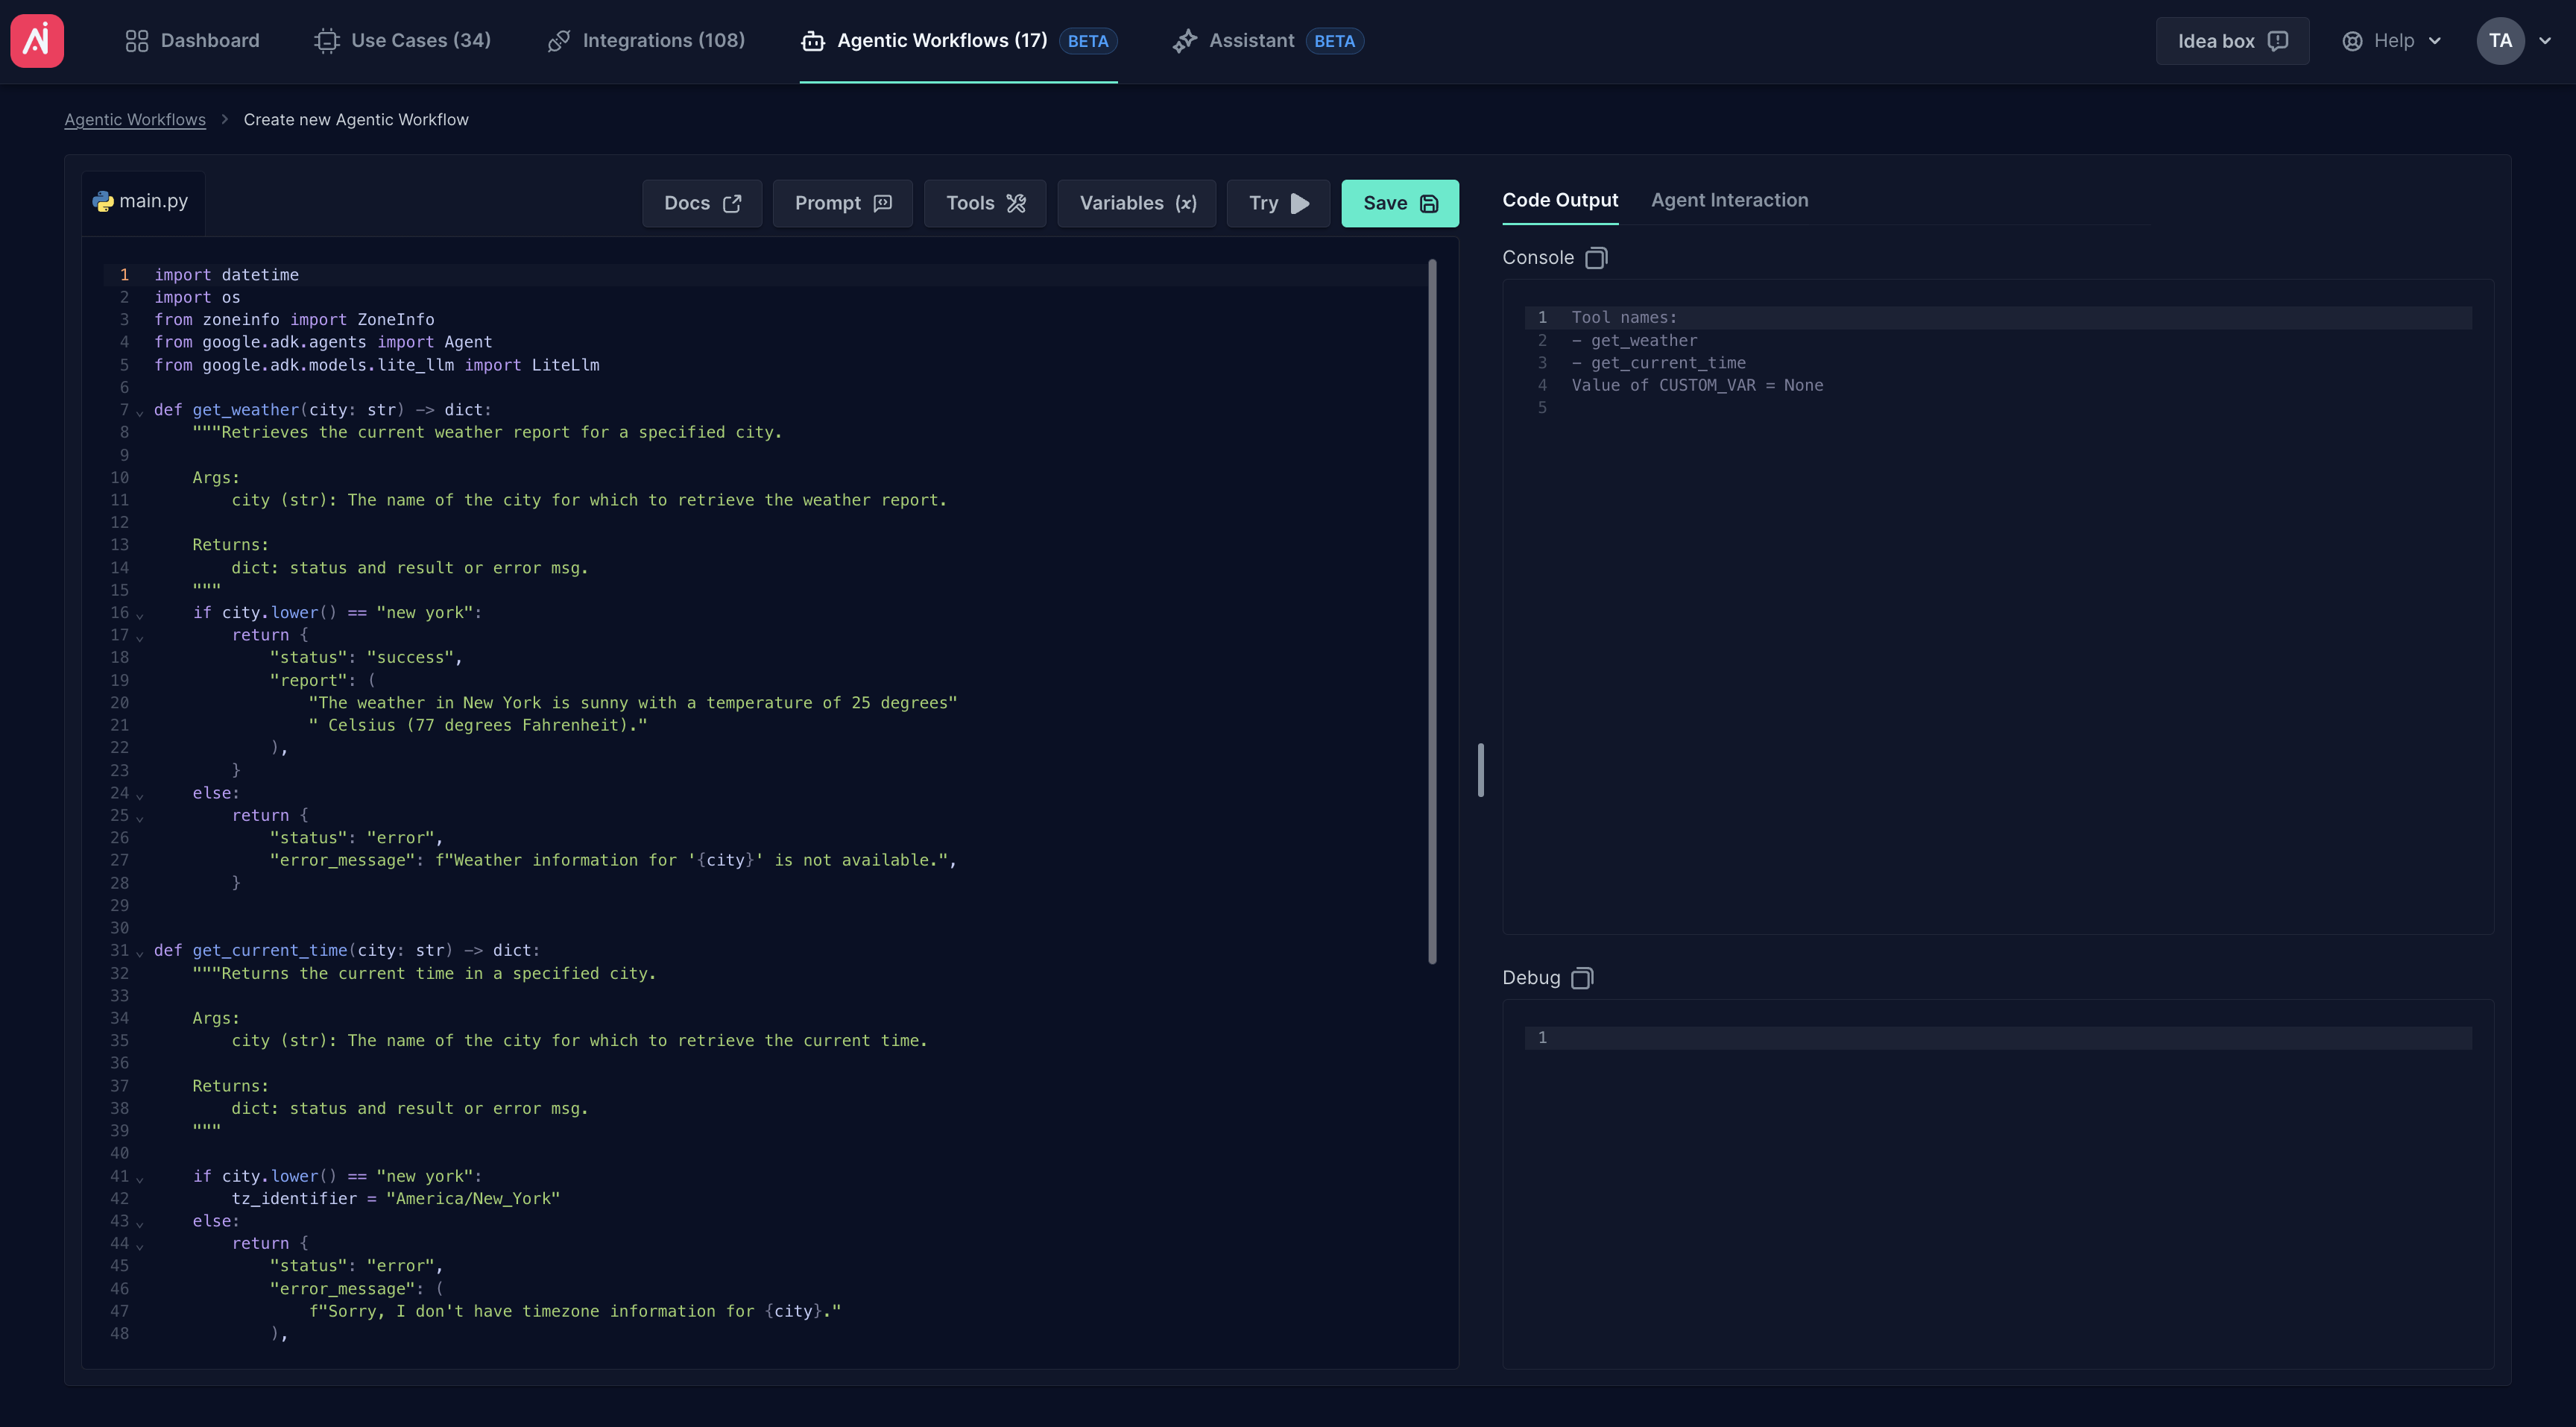
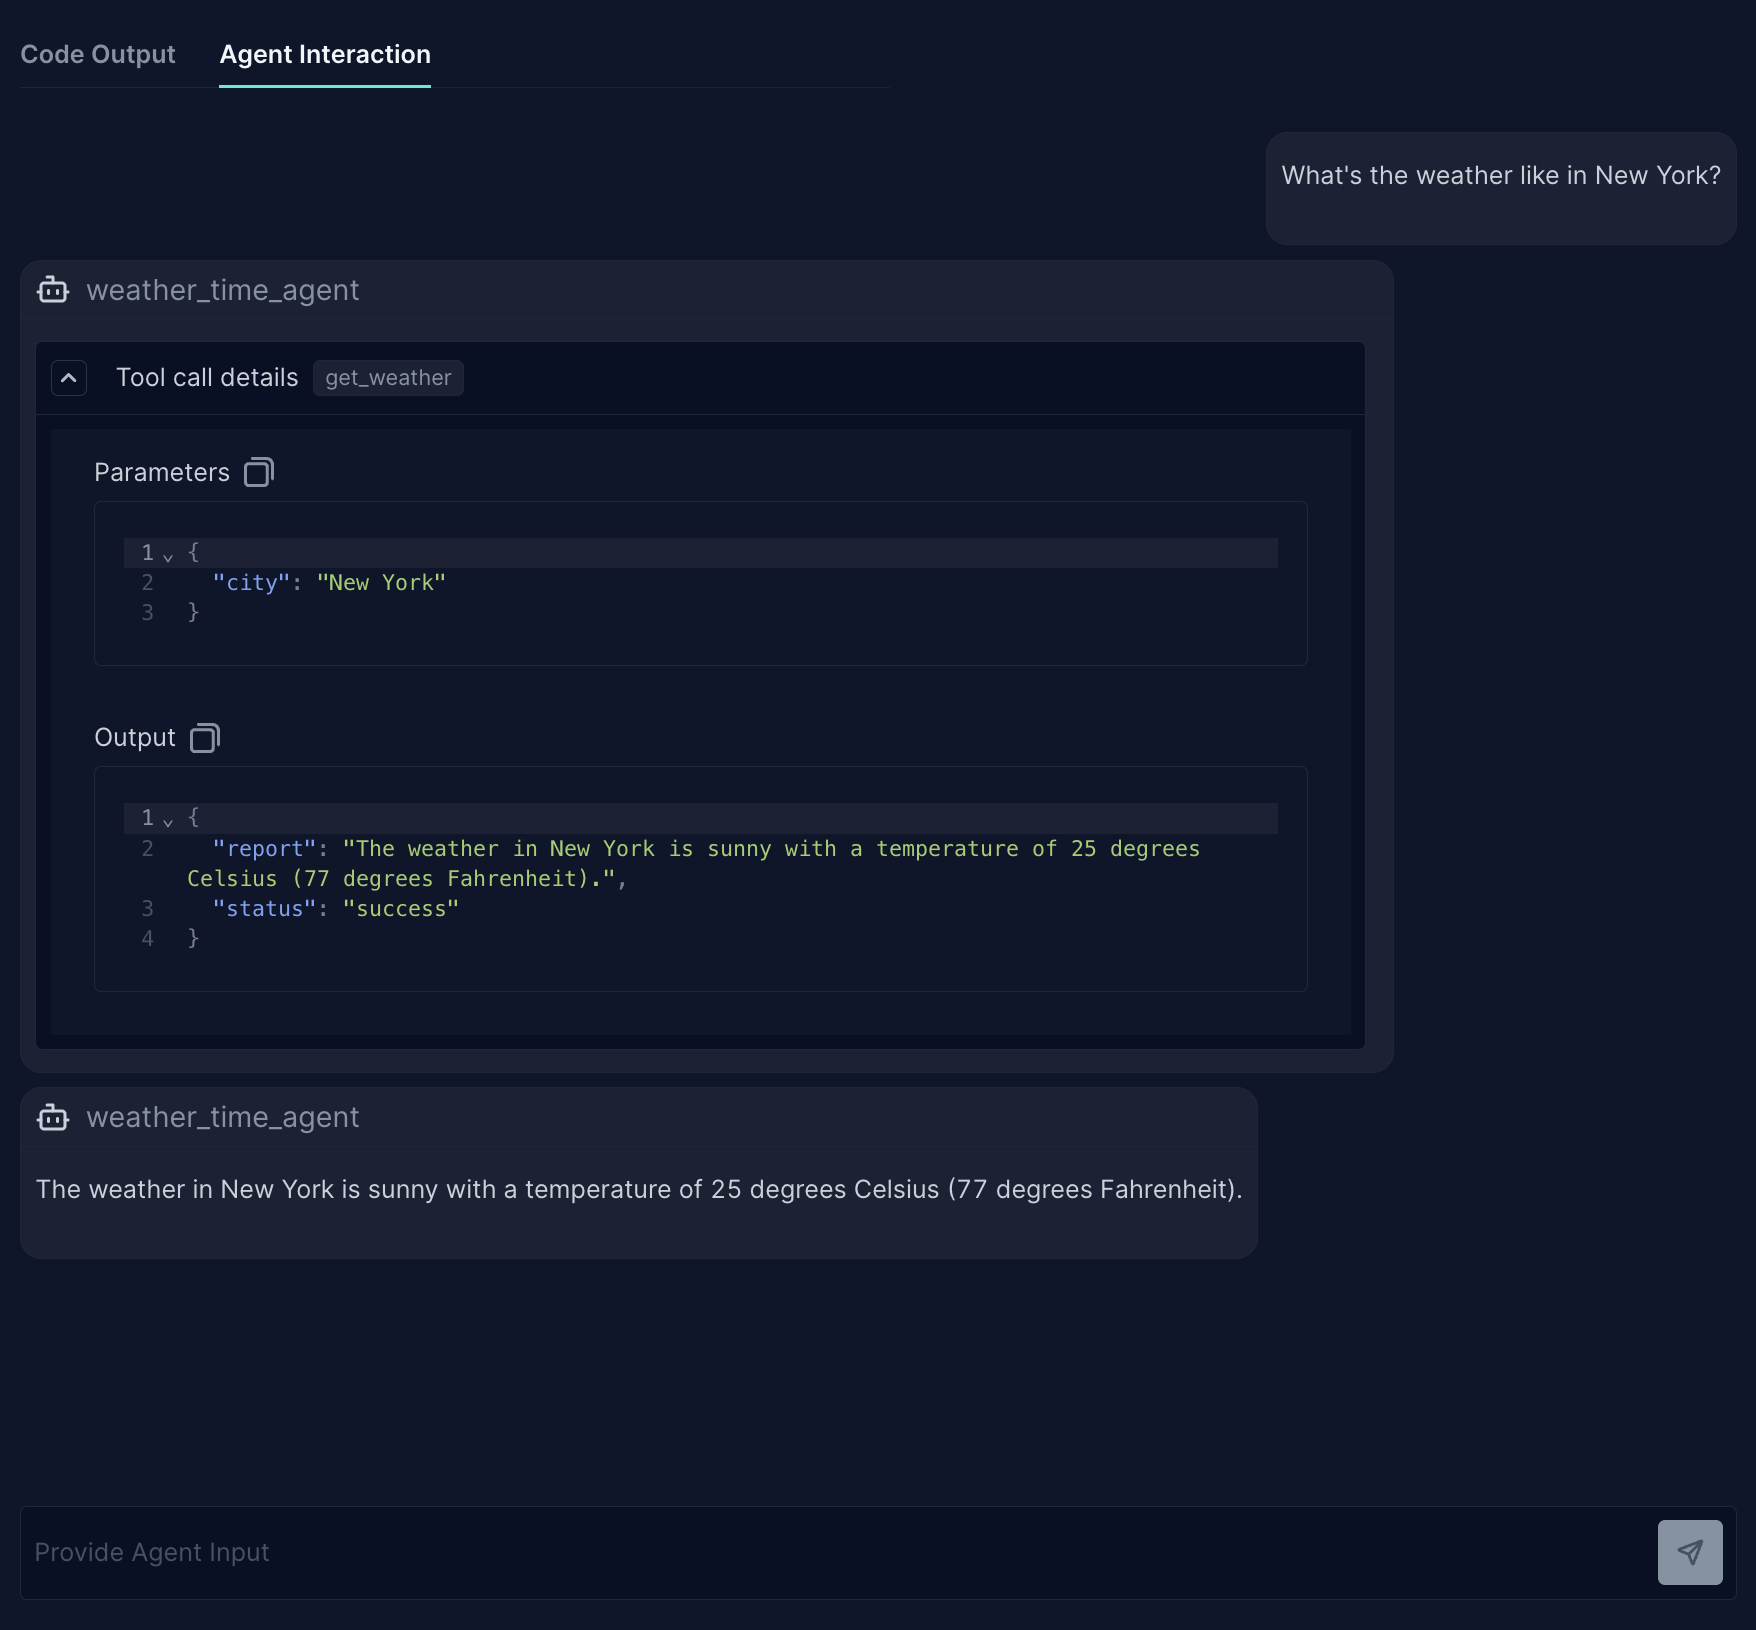
- If the syntax check is successful you will be redirected to the Agent Interaction tab, where you can interact with the agent you have created in a non-persistent session.
-
Click on 'Save' to save the agentic workflow for further use.
Code Structure
Basic Template
Every agentic workflow should follow this structure:
from google.adk.agents import LlmAgent
from google.adk.models.lite_llm import LiteLlm

# Define your LLM model (you can define multiple models and use them as needed)
MODEL = LiteLlm(model="gemini/gemini-2.0-flash")

# Must have a root_agent defined that is considered the main entry point for the workflow
root_agent = LlmAgent(
    name="my_agent",
    model=MODEL,
    description="Brief description of what this agent does",
    instruction="Detailed instructions for the agent's behavior",
    tools=[],  # Add MCP tools here with mcp_tools. prefix or custom tools
)
LLM Configuration
Choose your model based on your needs:
# Google Gemini
MODEL = LiteLlm(model="gemini/gemini-2.0-flash")

# OpenAI GPT
MODEL = LiteLlm(model="openai/gpt-4o")

# Anthropic Claude
MODEL = LiteLlm(model="anthropic/claude-3-5-sonnet-20241022")

# AWS Bedrock
MODEL = LiteLlm(model="bedrock/us-east-1.anthropic.claude-3-sonnet-20240229-v1:0")
Agent Types
Single Agent (LlmAgent)
Use for straightforward tasks that can be handled by one agent:
root_agent = LlmAgent(
    name="data_analyzer",
    model=MODEL,
    description="Analyzes data and provides insights",
    instruction="You are a data analyst. Use available tools to analyze data and provide clear insights.",
    tools=[mcp_tools.search_documents, mcp_tools.get_file_report]
)
Sequential Workflow
Use when tasks must be performed in a specific order:
data_collector = LlmAgent(
    name="data_collector",
    model=MODEL,
    description="Collects relevant data",
    tools=[mcp_tools.search_splunk, mcp_tools.query_arcanna_events],
    output_key="collected_data"
)

data_analyzer = LlmAgent(
    name="data_analyzer",
    model=MODEL,
    description="Analyzes collected data",
    tools=[mcp_tools.get_file_report],
    output_key="analysis_results"
)

root_agent = SequentialAgent(
    name="data_pipeline",
    sub_agents=[data_collector, data_analyzer],
    description="Collects and analyzes data sequentially"
)
Parallel Workflow
Use when tasks can run concurrently:
threat_hunter = LlmAgent(
    name="threat_hunter",
    model=MODEL,
    tools=[mcp_tools.get_url_report, mcp_tools.get_file_report]
)

splunk_analyst = LlmAgent(
    name="splunk_analyst",
    model=MODEL,
    tools=[mcp_tools.search_splunk, mcp_tools.list_indexes]
)

root_agent = ParallelAgent(
    name="security_investigation",
    sub_agents=[threat_hunter, splunk_analyst],
    description="Conducts parallel security analysis"
)
Loop Workflow
Use for iterative processes (repeatedly runs a sequence of agents for a specified number of iterations or until a termination condition is met):
monitoring_agent = LlmAgent(
    name="system_monitor",
    model=MODEL,
    tools=[mcp_tools.get_cluster_health, mcp_tools.metrics_job],
    description="Monitors system health and metrics"
)

root_agent = LoopAgent(
    name="continuous_monitoring",
    sub_agents=[monitoring_agent],
    max_iterations=10,
    description="Continuously monitors system status"
)
Best Practices
1. Agent Design
- Single Responsibility: Each agent should have one clear purpose
- Descriptive Names: Use meaningful names that reflect the agent's role
- Clear Instructions: Provide specific guidance on how the agent should behave
2. Tool Integration
- All MCP tools must be prefixed with
mcp_tools.(e.g.,mcp_tools.search_splunk) - Only include tools that the agent actually needs
- Create custom tools for specialized functionality not covered by MCP tools
3. Workflow Choice
- Single Agent: Simple, standalone tasks
- Sequential: Tasks with dependencies or specific order requirements
- Parallel: Independent tasks that can run simultaneously
- Loop: Iterative processes
4. Error Handling
- Include validation in your agent instructions
- Use try-catch patterns in custom tools
- Provide fallback strategies for failed operations
Example: Multi-Agent Security Investigation
import os
from google.adk.agents import LlmAgent, SequentialAgent
from google.adk.models.lite_llm import LiteLlm

MODEL = LiteLlm(model="gemini/gemini-2.0-flash")

# Stage 1: Data Collection
data_collector = LlmAgent(
    name="security_data_collector",
    model=MODEL,
    description="Collects security events and alerts from multiple sources",
    instruction="""You are a security data collector. Your job is to gather relevant
    security events from Splunk and Arcanna based on the user's query. Focus on
    recent events and provide comprehensive data for analysis.""",
    tools=[
        mcp_tools.search_splunk,
        mcp_tools.query_arcanna_events,
        mcp_tools.list_indices
    ],
    output_key="security_data"
)

# Stage 2: Threat Analysis
threat_analyzer = LlmAgent(
    name="threat_analyzer",
    model=MODEL,
    description="Analyzes collected data for potential threats and IoCs",
    instruction="""You are a cybersecurity analyst. Analyze the collected security
    data to identify potential threats, indicators of compromise (IoCs), and
    suspicious patterns. Use threat intelligence tools to enrich your analysis.""",
    tools=[
        mcp_tools.get_url_report,
        mcp_tools.get_file_report,
        mcp_tools.get_ip_report,
        mcp_tools.get_domain_report
    ],
    output_key="threat_analysis"
)

# Stage 3: Report Generation
report_generator = LlmAgent(
    name="security_reporter",
    model=MODEL,
    description="Generates comprehensive security investigation reports",
    instruction="""You are a security report writer. Create a detailed, actionable
    security investigation report based on the collected data and threat analysis.
    Include executive summary, detailed findings, IoCs, and recommended actions.""",
    tools=[],
    output_key="final_report"
)

# Root workflow
root_agent = SequentialAgent(
    name="security_investigation_workflow",
    sub_agents=[data_collector, threat_analyzer, report_generator],
    description="Comprehensive security investigation workflow that collects data, analyzes threats, and generates reports"
)
This example demonstrates a complete security investigation workflow that:
- Collects data from multiple security sources
- Analyzes the data for threats using intelligence tools
- Generates a comprehensive report
Each agent has a specific role, appropriate tools, and clear instructions for optimal performance.