Arcanna.ai and Trellix Helix (former FireEye Helix)
Introduction
This is a step-by-step guide that will explain how to integrate Arcanna.ai with your Trellix Hellix suite to automate your team's decisions with an AI Decision Intelligence platform.
Trellix Helix
Trelix Helix, formerly FireEye Helix, is an advanced security operations platform designed to streamline and enhance Security Operations Center (SOC) workflows. It integrates threat detection, investigation, and response capabilities into a unified solution, enabling SOC teams to quickly identify and mitigate security threats. The platform aggregates data from various security tools, networks, and endpoints, providing comprehensive visibility and actionable insights.
Prerequisites
- A valid Arcanna.ai instance - for setup, follow this user guide.
- A valid Helix instance A valid Helix instance.
- Https connectivity between Arcanna.ai instance and Helix Instance
- A valid Client Credentials Helix Client Credentials.
How to connect
Go to Helix instance:
- For FireEye Helix an access token is enough.Click Generate and copy token to the clipboard for further used in Arcanna.
- For newer Trellix Helix instance generate a client id and a client secret.See Helix UAM UI
Go to Arcanna instance:
-
Create the Trellix integration:
-
Go to the Integrations tab
-
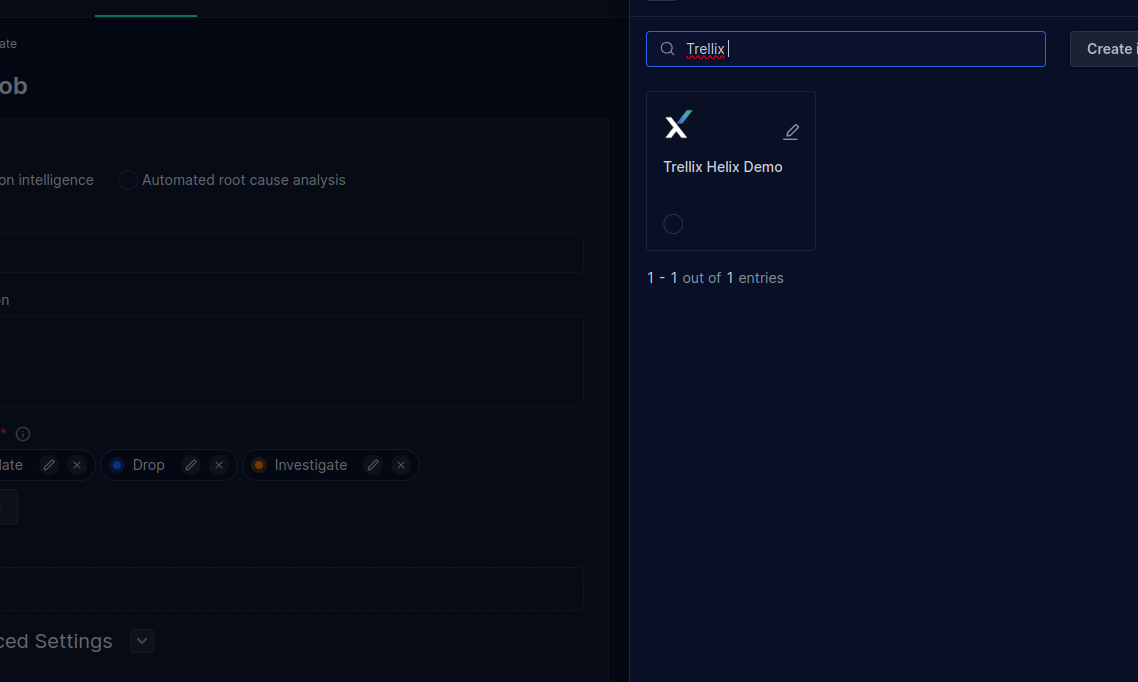
Search for the Trellix integration and click on it:

-
Fill in all the fields as shown below, using your own Client Credentials and Title, then click Confirm:

- For FireEye Helix use the switch with value Fireeye and input the token
- For Trellix Helix use the switch with Hellix_Connect and client id and the client_secret.Also please review the scopes and leave only the desired permission.
- All available scopes values are:
- xdr.srh.rw: Read and write access to search functionality, allowing query and modification of search-related configurations or results.
- xdr.rul.rw: Read and write access to rule management, enabling creation, update, and deletion of detection or response rules.
- xdr.dp.rw: Read and write access to data processing configurations or tasks, allowing management of ingestion or transformation pipelines.
- xdr.alr.r: Read-only access to alerts, enabling viewing of alert details without modification.
- xdr.dbr.r: Read-only access to the database or stored data, allowing query but no alterations.
- xdr.ind.r: Read-only access to indicators, such as threat indicators or observables, without modification capabilities.
- xdr.alr.rw: Read and write access to alerts, enabling management, updates, or resolution of alerts.
- xdr.so.r: Read-only access to system operations or settings, allowing viewing but no modifications.
- xdr.so.rw: Full access (read and write) to system operations, enabling configuration and management of system-level settings.
- xdr.ind.rw: Read and write access to indicators, allowing creation, update, or deletion of threat indicators.
- xdr.srh.adv: Access to advanced search capabilities, including complex queries, filters, or custom views.
- xdr.org.adm: Organizational administrator access, granting full control over settings, configurations, and user management within the organization.
- xdr.dbr.rw: Read and write access to the database or stored data, enabling query and modification as needed.
- xdr.dp.r: Read-only access to data processing tasks or configurations, allowing viewing but no edits to pipelines.
- xdr.rul.r: Read-only access to rule management, allowing viewing but no modification of detection or response rules.
- xdr.srh.r: Read-only access to search functionality, enabling query but no modification of search-related elements.
- All available scopes values are:
-
-
Create an Arcanna pipeline using Trellix integration:
- Go to AI Pipelines tab and click Create Pipeline:
- Complete the Title and select an input integration. We used the input integration named
Trellix Helix Demoas seen in the image:
- Fill the form with desired values:
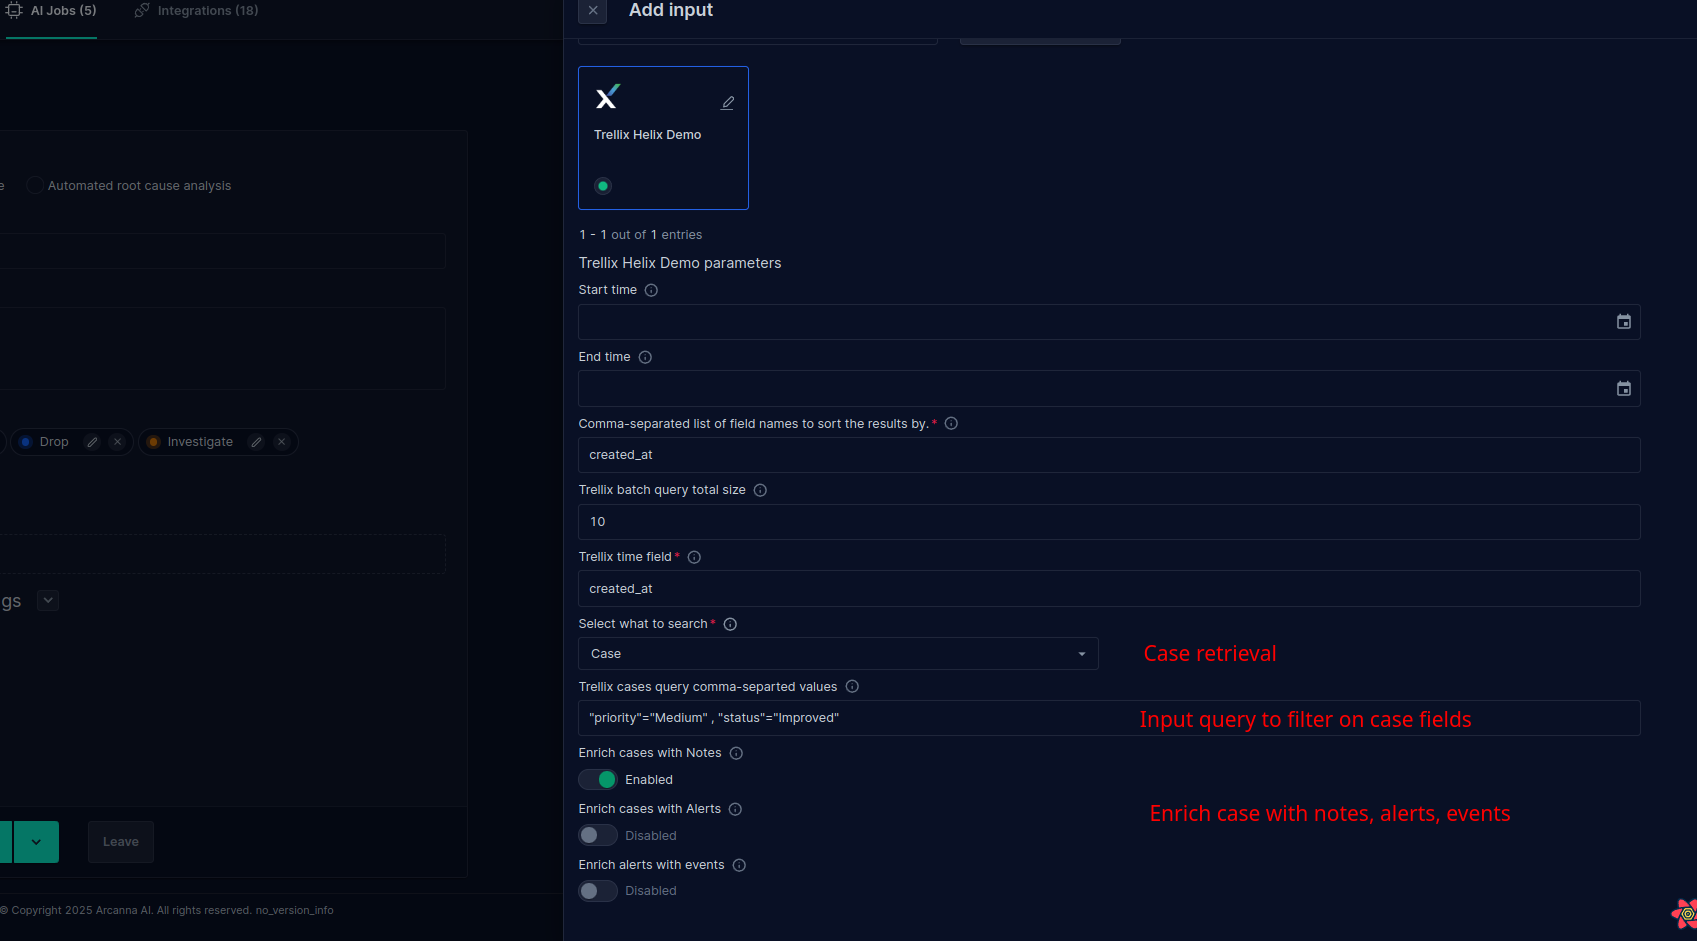
- User can select between case retrieval or alert retrieval by using the switch.
- Cases can be filtered based on following fields:
- name: Case name to filter on.
- organization: Trellix organization to filter on.
- priority: Case/Alert priority with possible values:
Low | Medium | High | Critical. - severity: A string for marking case severity, e.g.,
10. - state: Case state with possible values:
Testing/DemonstrationUnauthorized AccessDenial of ServiceMalicious CodePolicy Violation or Poor PracticeReconnaissancePhishingOther.
- status: Case status with possible values:
DeclaredScopedContainedRecoveredImproved.
- tags: Case tags, which can act as a source selector, e.g.,
aws | microsoft.
- Alerts can be filtered based on following fields:
- alert_threat: Threat associated with the alert.
- alert_type: Type of alert, specifying its nature.
- alert_type_destination: Specifies the destination type in the alert.
- alert_type_source: Indicates the source type in the alert.
- alert_type_srcdst: Combined source and destination type of the alert.
- alert_type_summary: Summary of the alert type.
- assigned_to: User or team assigned to the alert.
- classification: Classification of the alert.
- closed_state: The state of the alert once it is closed.
- confidence: Level of confidence in the alert, with possible values:
Low | Medium | High. - created_at: Timestamp when the alert was created.
- distinguishers: Unique attributes distinguishing the alert.
- intel_source: Source of the intelligence leading to the alert.
- is_suppressed: Indicates if the alert is suppressed.
- is_threat: Specifies if the alert is marked as a threat.
- is_tuned: Indicates whether the alert has been tuned.
- limit: Number of results to return per page.
- message: Description or details of the alert.
- metaclasses: Metaclass categories associated with the alert.
- mongo_id: Unique MongoDB identifier for the alert.
- offset: The initial index to start returning results.
- order_by: Field used for ordering the results.
- organization: Organization associated with the alert.
- origin_id: Unique identifier of the alert's origin.
- products: Products associated with the alert.
- queues: Queues to which the alert belongs.
- risk: Risk level associated with the alert.
- severity: Severity level of the alert, with possible values:
Low | Medium | High. - state: Current state of the alert.
- threat_type: Type of threat associated with the alert.
- trigger_id: Unique identifier for the alert trigger.
- trigger_revision: Revision number of the alert trigger.
- type: Type of the alert, with possible values:
fireeye_rule | customer_rule | fireeye_intel | tap_analytics | tap_sinkhole. - updated_at: Timestamp when the alert was last updated.
- updated_by: User or system that last updated the alert.
- Cases can be filtered based on following fields:
- The filter format to be used is:
"key1"="value1", "key2"="value2". Note: Ensure that both the keys and values are enclosed in double quotes ("), and separate each key-value pair with a comma (,). Example"priority"="Medium" , "status"="Improved" - Cases and Alerts can be enriched also with notes by selecting the slider Enrich cases with Notes
- Cases can be enriched with Alerts by selecting the slider Enrich cases with Alerts
- Alerts can be enriched with Events by selecting the slider Enrich Alerts with Events
Important Note: Each slider will trigger multiple HTTPS requests to Trellix to retrieve data.
Selecting a larger total number of events/alerts may result in a longer duration for data retrieval.
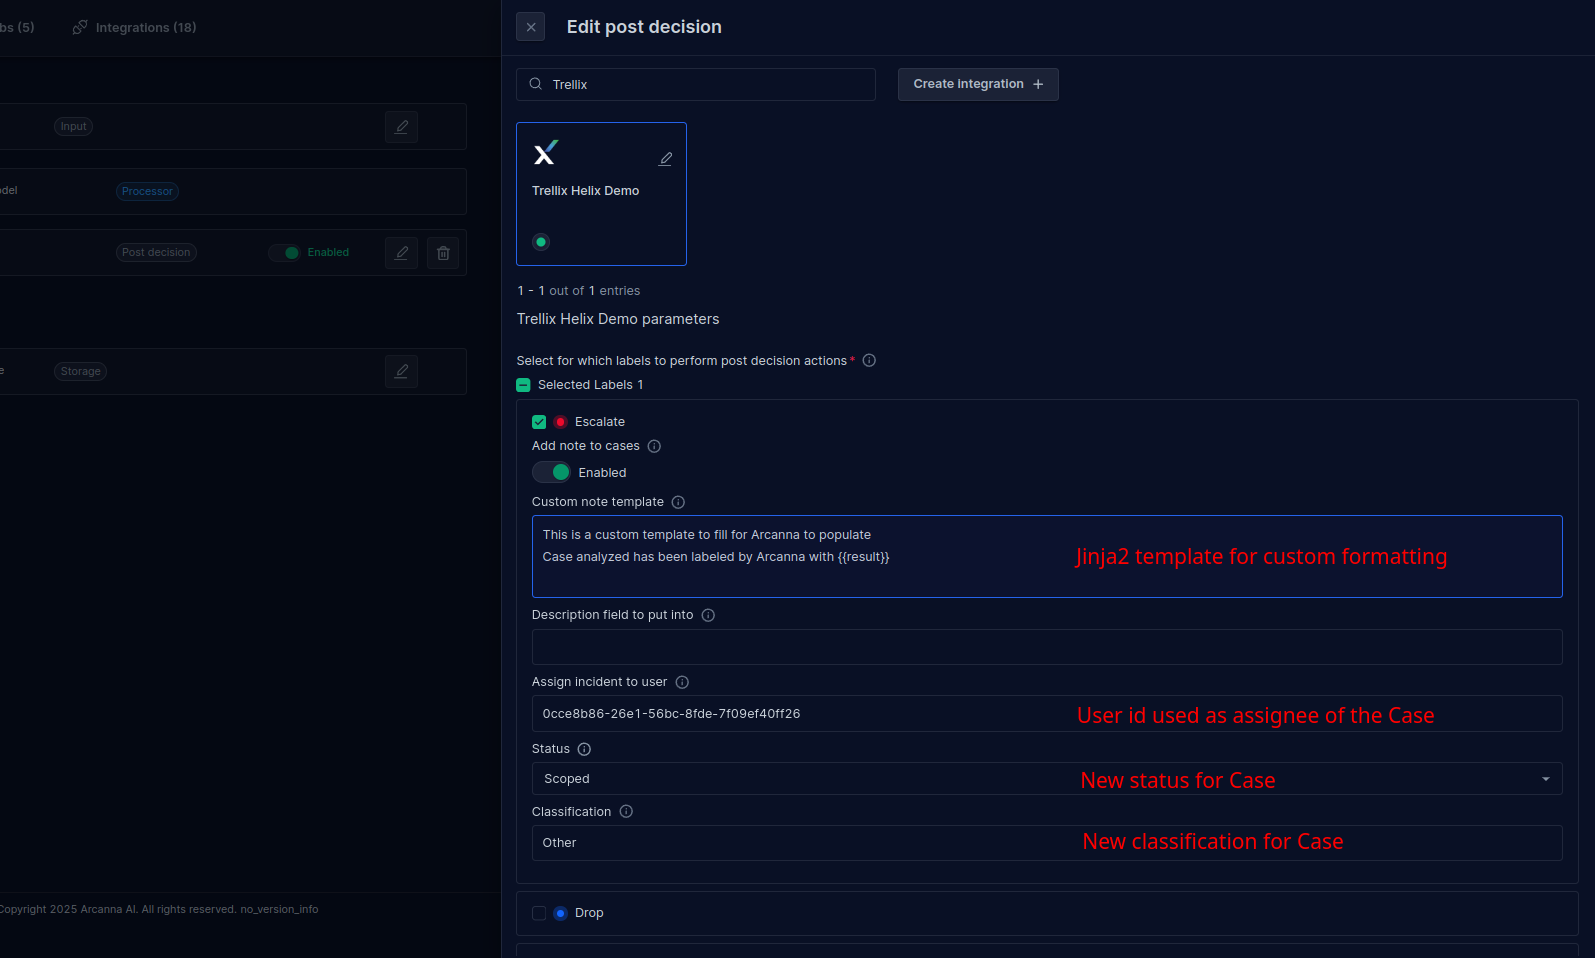
- (Optional) Add and configure Trellix integration from Flows page for PostDecision:
- Assuming an AI Pipeline has already been created, and having an AI Model, click on Flows:
-
On the Flows page, click Add integration +
-
Select Post Decision
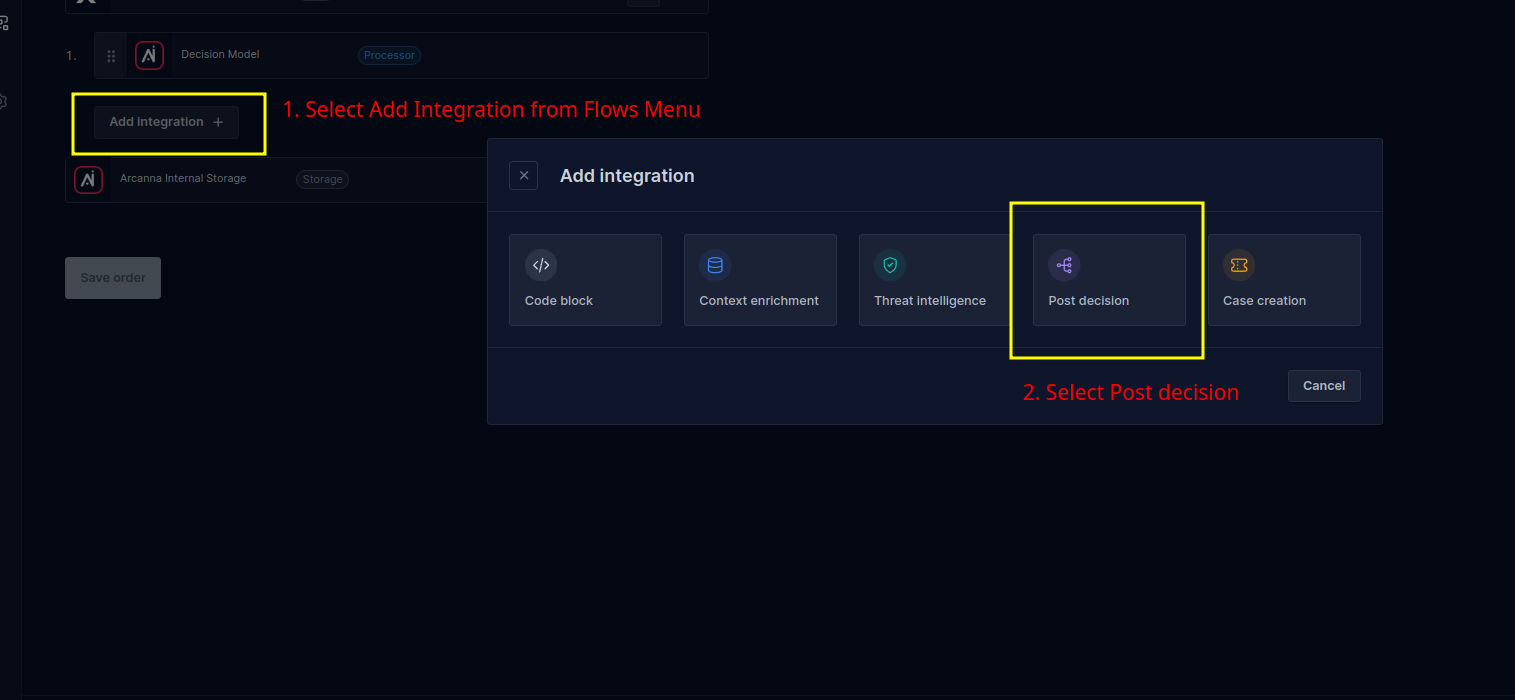 and Search for desired integration name.We used
 Trellix Helix Demo -
Fill Form by selecting the desired Arcanna.ai labels to perform the post decision action to update the case back on the Trellix instance.In this example we selected cases with Escalate Label to perform the post decision action on.
-
A custom note template using Jinja2 Jinja2 Docs . Example
Arcanna.ai suggests to mark this case as {{result}}. Suggested actions -
Cases can be assigned to a user by filling Assign incident to user using the user id.To locate the user id:
- Navigate to Trellix and open Developer Tools (press F12).
- Reload the home page (press F5) and check for requests in the Network tab.
- Inspect the Response tab for the request to:
https://xdr.trellix.com/helix/id/{hexid}/api/v1/users/session
Look for the value in:Example:{"users": [{"id": "0cce8b86-26e1-56bc-8fde-7f09ef40ff26"}]}0cce8b86-26e1-56bc-8fde-7f09ef40ff26
-
status: Case status can be updated to:
DeclaredScopedContainedRecoveredImproved.
-
classification: Case classification (state) can be updated to:
Testing/DemonstrationUnauthorized AccessDenial of ServiceMalicious CodePolicy Violation or Poor PracticeReconnaissancePhishingOther.